Modernizing my blog with Docker, Visual Studio Code and GitLab
I’ve recently moved this blog from GitHub Pages to GitLab Pages. Honestly, it started to become a bit awkward to have it hosted on the biggest competitor’s platform, while working at GitLab for more than a year now. From now on, both the code and the content of this website will be available here.
During the migration, I’ve decided to also upgrade the Jekyll theme powering the website, minima. My main goal was to get its dark version, only available in 3.0 onwards. (The blog’s colors now follow the user’s operating system or browser settings.) To do the upgrade and test my changes, I first had to create a local development environment on my computer and install the right version of Ruby. At this point, I thought to myself:
I can do better.
As a consequence of that thought, this post chronicles my journey into the rabbit hole of Visual Studio Code Dev Containers. I’ll document how I’ve adopted it in this project, and I’ll describe my take on integrating it with a DevOps platform like GitLab.
Let me start by saying this: I think that Visual Studio Code Dev Containers is the single best thing that happened to developer productivity in the last couple of years. Why do I say that? Follow along, and I will show you how one can save a lot of time, effort, and headache in their own projects by adopting a similar setup with this technology at the core of it.
In the rest of this post, whenever I reference some code in the repository backing up this blog, I’ll use this revision. It’s the last commit on the main branch at the time of writing. Also, the links to GitLab’s documentation all reference version 16.7, because that was the version running on GitLab.com while I was setting these all up.
Making my development environment reproducible #
Let’s get started! First step: make sure I never have to manually install a specific Ruby version again. The goal is to have a fully functional local development environment set up at the click of a button (or two).
Choosing the right tool for the job #
I evaluated two alternative solutions for this use case: Visual Studio Code Dev Containers and devfiles. For an in-depth comparison of the two technologies, I recommend this blog post.
In short, both of them heavily utilize Docker and are built around the same idea: apply Infrastructure as Code best practices for setting up local development environments. For both of them to work, you have to define a Dockerfile and a corresponding configuration file (specific to the given vendor), describing your environment. Then, you add these two files to your repository and version them together with the rest of the project’s code. This way, one really doesn’t need anything else installed on their computer other than Docker and a compatible IDE of their choice to start contributing to the code right after cloning it.
Even though GitLab workspaces supports devfiles, local development support with Visual Studio Code (my IDE of choice) is more mature with Dev Containers. (Understandably so, since both technologies are owned by Microsoft.) Because of that, I’ve decided to go with Dev Containers. Of course, I’ve considered GitLab workspaces as a solution too, but for my use case, setting up and managing a Kubernetes cluster just for that would be overkill. Especially since I always have a computer with Docker and Visual Studio Code ready when I want to make changes to the code of my blog. If it’s only about editing the posts themselves, I can do that easily from GitLab’s Web IDE, without even cloning the repository locally.
Defining my dependencies #
This part was the easiest. I added a very simple Dockerfile to the root of my repository:
FROM ruby:3.2.2

COPY src/Gemfile* .
RUN bundle install
RUN rm Gemfile*
It installs the right version of Ruby and the dependencies of my blog via its Gemfile(s).
Then I pinned all my Ruby dependencies in the above-mentioned Gemfile(s). Pinning dependencies in applications is a best practice that can save you a lot of trouble down the line. You can read more about this topic here. (That documentation is about JavaScript, but most of the reasoning there works for every other programming language and package manager as well.) In short, by specifying your dependencies down to their patch versions, you can make sure that your application is reliably reproducible in every single build.
You can (and in case of complex, mission-critical applications, you absolutely should!) take this a bunch of steps further by adopting the SLSA framework. Discussing that is out of scope of this post, but I can wholeheartedly recommend this excellent talk by the great Kelsey Hightower to drill down deeper into the topic. Nevertheless, adopting SLSA for this very simple, statically generated website would be overkill, so I didn’t do that.
Dev Container setup #
My devcontainer.json is also fairly simple:
{
  "name": "blog.bozso.dev",
  "build": {
    "context": "..",
    "dockerfile": "../Dockerfile"
  },
  "runArgs": ["--name", "blog.bozso.dev"],
  "customizations": {
    "vscode": {
      "extensions": [
        "mhutchie.git-graph",
        "GitLab.gitlab-workflow",
        "ms-azuretools.vscode-docker",
        "davidlday.languagetool-linter",
        "sissel.shopify-liquid"
      ]
    }
  }
}
It explains to Visual Studio Code where to find the Dockerfile and with what configuration to run it. One interesting part is the extensions section. It’s a very cool feature of Dev Containers that you can define the Visual Studio Code extensions your project uses. This way, when you open your project inside a Dev Container, the IDE will not just install your dependencies with Docker, but it will also install all the extensions needed to productively contribute to that project. (Something similar can be done without Dev Containers too, by using workspace recommended extensions. But those will be only recommendations, so the IDE won’t install them automatically.)
The rest of my configuration is standard Visual Studio Code stuff: tasks and workspace settings. I am mentioning these because they are also important pieces of the overall puzzle of creating a reproducible development environment with Visual Studio Code. But it’s important to note that these are not specific to Dev Containers by any means.
Note that in this project, I only use Docker containers for development. But with Docker’s multi-stage builds, one can easily use the same Dockerfile for running their application in production environments too. The big benefit of such a setup is that your development and production environments will be as close to each other as possible. This greatly simplifies understanding and maintaining those environments. Here is a good example of such a setup.
At this point, all I needed on my local machine is Docker and Visual Studio Code to make changes to my blog. I can be 100% sure that no matter how much time passes between writing two posts, my development environment will be quickly ready. My developer experience will also be always consistent, regardless of what operating system I am currently on. Not to mention that this way, my whole setup is fully self-documenting. If you check this project’s development documentation, you can see that there’s no information about how to set up a development environment. It’s not because of carelessness, but because there’s simply no need to be more verbose.
But there were still some important pieces of the puzzle missing. I needed two places: one where the website’s code and content would be stored and built, and one where the built version of those would be hosted. Luckily, the answer was simple to both of those: GitLab.com.
Configuring my GitLab project(s) #
As mentioned at the beginning, this blog’s code and content are both stored in this GitLab project and it’s deployed into GitLab Pages from there. But to have a fully working system, I had to set up some additional stuff.
Private fork #
I wanted to have a separate, private test environment where I can review the latest edits before actually deploying them into production, making my changes available on the public internet. While it’s possible to deploy different versions of a GitLab Pages website from the same project, it’s not possible to individually restrict access to them.
My main project is also public, but I wanted to keep the posts I am working on accessible only to me. In git, it’s not possible to set the visibility of individual branches, so I couldn’t get away with simply committing my changes on a separate, “secret” branch.
Both of these vectors pointed me in the direction of creating a private fork. This is the setup I ended up with:
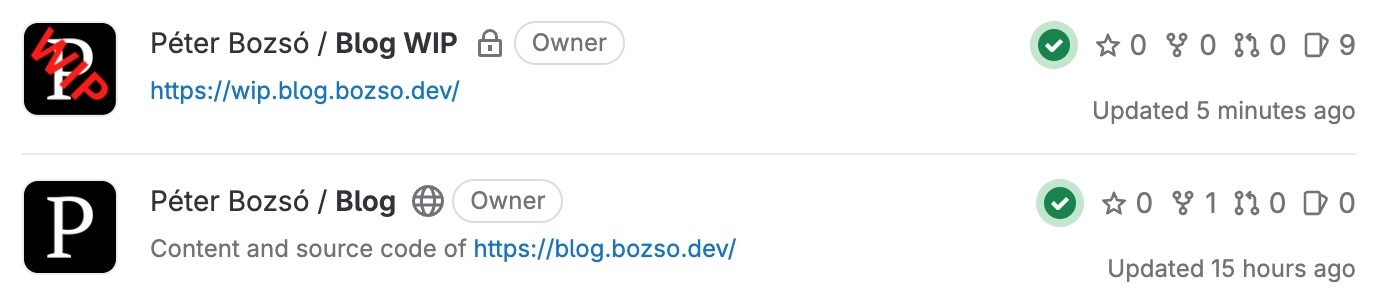
As you can see, the second one is the project backing this website. The other, more secretive one, marked as WIP (work-in-progress) is the version of my blog which I am currently working on. It contains the unfinished posts that are under construction, the UI changes that I am testing and an issue board with my ideas for the future. In short: everything I don’t want to make public (yet).
The two projects are set up almost the same, but the fork’s configuration has some key differences:
Its GitLab Pages is set up with a different URL (https://wip.blog.bozso.dev/).
It has GitLab Pages access control turned on. This way, only contributors to the containing GitLab project have access to the website. This practically means me only.
Its default branch is set to
draftinstead ofmain.
My workflow #
When I work on my blog, I usually do it like this:
I clone the WIP repository to my local machine.
To edit an existing post or to create a new one, I make my changes on top of the
draftbranch. Then, to review my changes in the test environment, I rebasedrafton top ofmain, squash my commits and push them to the remote. (I write draft posts using a lot of very small commits, usually with meaningless commit messages like “Edit”, “Fix”, etc. So squashing those first is a must.)This push will kick off my GitLab CI/CD pipeline, which will deploy into the project’s GitLab Pages environment. (More about how this works below.)
After that, I review the new version of the website available at https://wip.blog.bozso.dev/. If I find that everything is as it should be, I push my changes to the
mainbranch of the public project. This will trigger another deployment, updating the content of this website you are looking at right now.
Of course, for testing, I could just use Jekyll’s built-in draft feature. But (following best practices) I want to make sure that the test environment of the app mirrors production as closely as possible.
If I want to make changes to the underlying code of the blog (so either to its visual style or structure), I always do that on the main branch of the WIP fork. Then I rebase the draft branch on top of it and force push that to review my changes. If I am happy with the results, I push my changes (on the main branch) to the public repository too.
For convenience, I’ve added the public project’s repository as a remote locally. This way, I can conveniently push my local main branch both to origin (which points to the WIP project’s repository) and to public, which is the remote of the public GitLab project.
If I spot some mistakes in the live version of the blog and I want to fix them quickly, I don’t even have to clone the repository locally. I just use GitLab’s Web IDE in the public project and make my changes directly inside the browser, committing them on top of the main branch. Then I can do the syncing of the WIP repository’s main branch and the rebasing of the draft branch locally later.
CI/CD pipeline #
Okay, what else is missing? Of course: automation!
My pipeline is relatively simple, but it still has its fair share of tricks. Let’s look at those piece by piece!
The first part is rather straightforward:
workflow:
  rules:
    - if: $CI_COMMIT_BRANCH == $CI_DEFAULT_BRANCH
It controls the pipeline’s execution and means: “Run this pipeline only for commits on the default branch.” This is main for the public repository, while draft for the WIP one.
Then comes the first job, which is a bit more tricky:
docker:
  rules:
    - changes:
        - Dockerfile
        - src/Gemfile*
  stage: build
  image: docker:24.0
  services:
    - docker:24.0-dind
  variables:
    # https://docs.gitlab.com/16.7/ee/ci/docker/using_docker_build.html#docker-in-docker-with-tls-enabled-in-the-docker-executor
    DOCKER_TLS_CERTDIR: "/certs"
  resource_group: container_registry
  script:
    - docker build -t $CI_REGISTRY_IMAGE .
    - docker login -u $CI_REGISTRY_USER -p $CI_JOB_TOKEN $CI_REGISTRY
    - docker push $CI_REGISTRY_IMAGE
A lot to unpack here! Let me jump around a bit, so it’s easier to understand the full picture:
script: Build, then publish the resulting Docker image to the project’s own GitLab container registry.rules/changes: Controls job execution and tells GitLab to run this pipeline only if there are changes to the Dockerfile or to its Gemfile(s). This results in speeding up the pipelines significantly, since the image is being rebuilt only if the project’s dependencies change.Building the Docker image takes around 1.5 minutes, while building and publishing the website using that (more on this below, in the explanation of the
pagesjob) only takes around 0.5 minutes. By doing the former only when it’s necessary, the total build time for ~99% of my commits is only 30 seconds instead of 2 minutes. Because of this, I can see my changes live in the WIP environment nearly instantly after pushing them to the remote.resource_group: Used to manage the concurrency of the jobs in the pipeline. More about this in the explanation of thepagesjob below.The rest is standard Docker-in-Docker stuff.
The last one is the deployment job:
pages:
  stage: deploy
  image: $CI_REGISTRY_IMAGE
  resource_group: container_registry
  script:
    - cd src
    - jekyll build -d ../public
  artifacts:
    paths:
      - public
It might seem a bit empty. That’s because there are some serious, GitLab Pages-specific ceremonies going on around here. This tutorial is enough to fully understand what is happening above, including the role of the public folder. In short, this job builds the app’s source code into static HTML and CSS files and publishes them to GitLab Pages.
But there are two important, non-standard things:
image: To run this job, I am using the Docker image I built in the previous,dockerjob. The beauty of this is that I can quite effortlessly use the same Docker image to work with the project on my local machine, as well as to build the production version of the website on my build server.resource_group: This one is the trickiest part. I need to use a GitLab resource group to manage concurrency in my pipelines. It covers a corner case, which doesn’t really happen at the frequency I commit to these repositories, but I wanted to make this pipeline really production ready.Imagine a situation where I push two commits at the same time:
Commit A, which only modifies my dependencies, andCommit B, which only adds a new post. (Commit Bis on top ofCommit A.) My intuition is that something like this would happen:Commit Akicks offPipeline Athat builds and pushes a new version of my Docker image.Commit Bkicks offPipeline Bthat pulls the Docker image newly produced byPipeline A. Using that, it builds and deploys the latest version of my blog to GitLab Pages.
This is exactly what happens if enough time passes between two separate pushes, and
Pipeline Ahas time to finish beforePipeline Bkicks off. But unfortunately, if I push two such commits at the same time or very quickly after each other, even though their pipelines won’t start exactly at the same time, their executions will still overlap. (The order in which they start will still beA, thenB.) This will result inPipeline Bbuilding the blog using an outdated Docker image from the registry, since the one it really needs is still being built inPipeline A.GitLab resource groups are the solution to this problem. With this feature, you can define a so-called resource group, which certain jobs in your pipelines must wait to acquire before proceeding. Only one job can hold a resource group at the same time. If you are familiar with multithreaded programming, it’s pretty much the concept of locks, implemented in CI/CD pipelines. Their most popular use case is to block multiple pipelines from modifying a server environment at the same time. But as you can see, their usefulness is not limited to just that. By using a resource group named
container_registryin my pipeline, I was able to configure my jobs to work without overlaps and produce the right deployments even in the corner case described above.It’s important to note that even though
Commit Aonly modifies dependencies, my pipeline is set up in a way that thepagesjob will be executed inPipeline Aeven in that case. This could cause a problem even when using a resource group, since a sequence like this is possible:dockerjob inPipeline A:Gets hold of
container_registry.Builds and pushes the latest Docker image.
Releases
container_registry.
pagesjob inPipeline B:Gets hold of
container_registry.Pulls the latest Docker image.
Deploys the latest version of the blog.
Releases
container_registry.
pagesjob inPipeline A:Gets hold of
container_registry.Pulls the latest Docker image.
Deploys an outdated version of the blog, overriding the previous, correct version.
Releases
container_registry.
Luckily, this is not a problem in my case, since the GitLab Pages’ built-in
pages:deployjob won’t deploy artifacts generated from outdated commits. So the deployment in step 3/3 simply never happens in my pipelines.If that weren’t the case, then the solution would be to either skip the
pagesjob if there are only dependency changes (similarly to how I control job execution withrules/changesin thedockerjob). Or I could configure the process mode of the resource group to benewest_first.
Other changes #
Jekyll is a very powerful static site generator, in no small part because of its extensive plugin ecosystem. While upgrading my blog, I decided to add some extra features to it.
I’ve added anchor headings, as well as I’ve made all the links open on new tabs with this plugin.
While at it, I’ve enabled live reloading during development. This way, I don’t need to manually refresh my browser to see my changes when writing posts locally.
I’ve also changed parts of the layout, updated the about page, fixed some grammar in my old posts and replaced the favicon.
With this setup, as you can imagine, validating all these changes was really a breeze.
Conclusion #
The setup I’ve described in this post serves me well. It makes it very straightforward for me to add content to my blog by utilizing DevOps best practices. All the while, the whole system still stays fairly simple. I hope that with this post, I was able to give you some useful pointers about how to replicate such a setup yourself.
Last but not least, It was great fun setting this whole thing up as well as writing about my experience. I hope you’ll have the same amount of fun modernizing your own applications!
Special thanks to Antal János Benjamin and Tamás Szabó for helping me to figure out if one commits on, in or to a branch when using git. For the record, the result of our academic debate is: on.